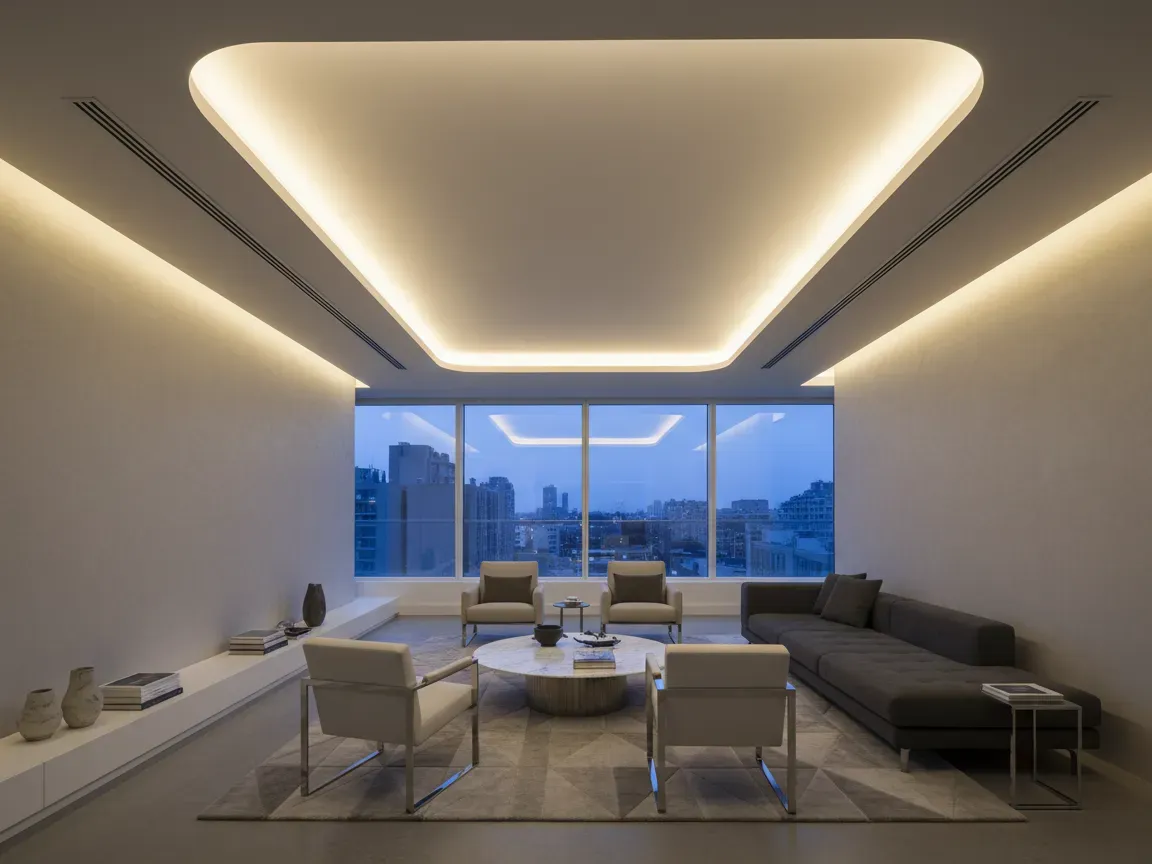
A living room makeover often starts with paint swatches, flooring samples, and furniture arrangements. However, the architectural element that truly shapes how these textures and dimensions feel is indirect illumination. Concealed fixtures shift the focus from visible bulbs and decorative pendants to the quality of light itself, emphasizing ceiling lines, wall finishes, and room proportions.
Integrating indirect illumination requires forward planning before framing and drywall work begin. By understanding how light reflects off interior planes and learning how to conceal modern LED hardware seamlessly, you can craft a sophisticated interior that easily adapts from bright family gatherings to relaxed evening entertainment.
Why hidden illumination elevates modern living room design?
Traditional ceiling design often relies on a central chandelier or an arbitrary grid of recessed spotlights. While functional, this approach frequently produces glare, harsh shadows, and ceiling clutter. Hidden channels and architectural coves transform the ceiling into a soft, secondary reflector, washing horizontal and vertical surfaces with a continuous, glare-free radiance.
By casting light along the perimeter or tucking it into shallow ceiling drops, you create an optical illusion of higher ceilings and expansive boundaries. This indirect glow enhances wall textures, such as lime plaster, wood paneling, or neutral matte paint, without revealing the source. The resulting ambiance feels calm and structured, giving the living space an understated luxury that decorative fixtures alone cannot accomplish.
Designing ceiling coves for balanced ambient glow
Ceiling coves must be engineered with precise proportions to deliver an even wash of light across the ceiling plane rather than creating a tight, localized beam. The critical dimensions include the cove depth, the height of the concealing lip, and the distance between the fixture and the finished ceiling.
A lip that is built too tall cuts off the light angle, trapping illumination inside the trough and creating a dark stripe along the wall edge. Conversely, a lip that is too low exposes the bare fixture to anyone seated on a low sofa. As a baseline, maintaining at least eight to twelve inches of clearance between the top of the cove and the ceiling allows the light to spread naturally toward the center of the room. Painting the interior trough in a clean, flat white ensures maximum reflection without shifting the intended color temperature of your diodes.
Choosing optimal channels and hardware for flush installation
Surface-mounting bare tape inside a recess frequently leads to early failure and unsightly visual defects. High-output diodes generate heat that must be dissipated, and exposed chips produce visible reflections on glossy ceilings, commonly known as diode spotting.
Extruded aluminum housings solve these challenges by serving as protective heat sinks while holding specialized diffusion lenses. For clean, minimalist reveals along baseboards, curtain pockets, or ceiling perimeters, architects often specify recessed LED strip lighting to ensure a perfectly straight line that blends into plasterboard. Frosted and opal diffusers blend individual points of light into a unified, continuous beam. When choosing profiles, prioritize channel depth; deeper profiles give the light beam enough space to blend before passing through the lens, completely eliminating dotting.
How do you plan wiring and driver access before drywall goes up?
Concealing the hardware is only half the battle during a renovation; you must also conceal the low-voltage infrastructure. LED strips operate on constant-voltage direct current, usually 12V or 24V, requiring dedicated power supplies that step down mains electricity. Leaving these drivers permanently sealed behind drywall is a code violation and a maintenance hazard.
Plan centralized or accessible locations for all drivers early in the framing stage. Ideal spots include nearby utility closets, ventilated cabinetry below media units, or discreet access panels painted to match surrounding walls. Calculate wire gauge carefully to avoid voltage drop, especially when runs between the driver and the hidden channel exceed fifteen feet. Thicker low-voltage cabling maintains consistent brightness from the first diode to the last, preventing noticeable dimming toward the end of long runs.
Managing color temperature and dimming zones across the living area
A comprehensive living room lighting scheme relies on flexible zones rather than a single master switch. By isolating cove lighting, media wall channels, and functional accent lights onto separate dimming circuits, you gain precise control over the mood throughout the day.
Color temperature plays a significant role in how comfortable a living room feels after dark. Warm white options, particularly 2700K, mirror the comforting tone of incandescent filaments and harmonize well with natural wood accents and fabric upholstery. For ultimate versatility, consider dim-to-warm technology, where the diodes automatically shift from a clear 3000K down to an amber 1800K as you lower the output. Ensure your control protocol, whether smart wireless controls or phase-cut dimmers, matches your driver specifications to prevent audible buzzing and low-end flicker.
Mistakes to avoid when mapping indirect lighting layouts
One frequent error during living room makeovers is failing to account for sightlines from seated positions. A cove or channel that appears completely hidden while standing might reveal its diode profile or wiring connectors when you recline on a lounge chair. Always check mockups from typical seating heights before finalizing lip profiles and channel positions.
Another common pitfall is ignoring ceiling finish quality. Because grazing light travels parallel to adjacent surfaces, it highlights every small tape seam, nail pop, and drywall imperfection. When planning indirect ceiling illumination, require a Level 5 drywall finish along any plane receiving a direct wash of light. Lastly, avoid using ultra-high-gloss paints in rooms with linear channels, as glossy sheens create mirror-like reflections of the diffuser lenses.
Bringing architectural illumination into your living space
Designing integrated lighting requires close collaboration between your design vision, rough carpentry, and electrical infrastructure. Taking the time to calculate cove dimensions, select suitable aluminum housings, and map out remote power access ensures that your architectural elements look crisp by day and function effortlessly by night.
When implemented with care, hidden light sources fundamentally alter the atmosphere of a home. Instead of drawing attention to decorative light fixtures, the architecture itself provides calm, comfortable illumination that supports every daily activity, enhancing the long-term enjoyment and value of your living room makeover.